Guide
Cross Stitch Designer Workflow: From Idea to Finished Chart
The short answer
A reliable cross stitch design workflow is brief, size, draft, palette, refine, check, test, export. Decide what the piece is for and how big it will be, draft the shapes (from a photo, text or a blank grid), lock a small palette, refine in editing passes, run a stitchability check, stitch a test section, then export a clean chart with a key and keep a backup of each version.
Whether you design one pattern a year or one a week, a repeatable workflow turns “I have an idea” into a chart someone can actually stitch. This is the process we recommend with the Studio editor on this site, but each step applies with any cross stitch designer software.
1. Brief: what is it for?
Write one sentence: “A 5-inch hoop of a cottage with the family name for a housewarming gift.” It sets the size, the tone and the deadline. It also stops scope creep: if the brief says hoop, you don’t need a 200-stitch landscape.
2. Size: set the canvas in stitches
Convert the brief to stitches: a 5-inch hoop with some breathing room is about a 4-inch design, which is 56 stitches on 14-count. Set the canvas to that size. You can always resize, but designing to a fixed canvas keeps decisions honest. (Size formula)
3. Draft: get the big shapes down
Choose the fastest route to rough shapes:
- From a photo: convert with a low colour count (6–10) just to get proportions, then redraw over it.
- From text: generate lettering in the text generator and paste it in.
- From scratch: block shapes with rectangles and lines, or sketch on paper first.
Don’t add detail yet. A draft should read clearly when zoomed out.
4. Palette: decide and name colours
Lock a palette before detailing. For each object, a base, a shadow and a highlight is usually enough. Name colours by role (“Roof base”, “Roof shadow”) in the Colours panel; names travel into the printed key. Keep it small: every extra colour is a thread change for every stitcher.
5. Refine in passes
Work in separate passes rather than fixing everything at once:
- Silhouette pass: are outlines clean and consistent?
- Value pass: switch to Symbols view or squint; is light versus dark clear?
- Detail pass: add eyes, windows, text, highlights.
- Symmetry pass: copy, flip and paste mirrored halves for perfect symmetry.
Every edit is undoable (100 steps), so try bold changes freely.
6. Check stitchability
Open the Check panel:
- isolated groups: single stitches that each need a thread start
- regions per colour: a colour split into 40 regions means lots of jumping
- colours used versus planned
Protect deliberate details, preview cleanup, and apply only what helps (confetti guide).
7. Test stitch
Stitch the hardest 10 × 10 area: a face, small text, a tricky gradient. Real thread may reveal that two colours are too close or a line is too thin. Adjust the chart, not your expectations.
8. Export and document
Export a PDF with overview, key and chart pages; check one page at 100% print scale. Add the finished size and fabric to your notes. If you share the pattern, include credits for any source material and a clear licence.
9. Version and back up
Before major changes, duplicate the project from My projects so you can return to an earlier version. Download the project file as a backup. Projects live only in your browser, and clearing site data removes them.
A realistic timeline for a small custom piece
| Step | Time |
|---|---|
| Brief and size | 10 min |
| Draft | 30–60 min |
| Palette and refine | 1–2 h |
| Check and fix | 15 min |
| Test stitch | 30 min |
| Export | 5 min |
The Orange Butterfly pattern shows the result of this process at small scale: four colours, mirrored wings and deliberate single-stitch antennae.
Common mistakes
- Detailing before the silhouette works.
- Letting the palette grow one shade at a time.
- Never testing with real thread.
- Keeping only one copy of a project that took days to design.
Worked example: a symmetric motif in under two hours
Brief: a 25 × 25 stitch butterfly for a card.
- Canvas (2 min): open a blank 25 × 25 grid in the Studio.
- Draft half (20 min): with the line and rectangle tools, draw the left wing and half of the body against the centre column.
- Mirror (2 min): select the left half, copy, paste, flip horizontally, nudge it into place against the centre and apply.
- Palette (10 min): limit yourself to four colours: wing colour, darker edge, spot colour and body. Add them in the Colours panel and name them.
- Detail pass (20 min): add spots, antennae and an outline.
- Check (5 min): run the Stitchability Check. The antennae will show as isolated single stitches; that’s intended, so protect them and ignore the warning.
- Export (5 min): download a PDF and a stitched-look PNG for sharing.
- Test (30 min): stitch one wing on a scrap and adjust colours if needed.
Keeping designs organised
- Name projects consistently, for example “2026-10 Butterfly v2”.
- Duplicate before risky changes so you can return to an earlier version.
- Keep a short notes file with fabric, count, strands and thread choices for each finished design.
Design review questions
- Does it read at thumbnail size?
- Is every colour doing a distinct job?
- Are isolated stitches intentional?
- Is the finished size right for its purpose?
- Would a beginner understand the chart without asking questions?
A checklist before you share or gift a chart
- Stitch count and size: confirm the finished size on the fabric you’ll recommend, with margins. Put both on the cover page (the PDF overview does this automatically).
- Centre marks: make sure the centre arrows fall where you expect, especially on designs with odd widths.
- Isolated stitches: run the Stitchability Check and decide, group by group, whether each single stitch is a deliberate detail or noise.
- Symbols: check that no two symbols are confusing at the printed cell size; swap any that are in the Colours tab.
- Threads: give every colour a DMC code you’ve checked by eye, and use the estimates in the key to say how many skeins are needed.
- Licence and credit: state how the chart may be used. If you started from someone else’s artwork or photo, make sure you have permission to share a chart of it.
- Test print: print the overview and one chart page at 100% and stitch a small corner. It’s the only reliable way to catch a mistake before someone else does.
A chart that passes all seven is ready to share. Save a project file alongside the PDF so you can make changes later without starting again.
Questions stitchers ask
How long does it take to design a small pattern?
A small custom piece often takes two to four hours from brief to export, including a short test stitch. Larger photo-based designs take longer to refine.
Should I design on paper or on screen?
Both work. Paper is great for ideas and rough shapes; an editor is better for exact counts, symbols, symmetry and printable charts.
How do I keep versions of a design?
Duplicate the project before big changes and download a backup file. Projects are stored only in the browser, so backups matter.
When should I test-stitch?
Before committing to a large piece, stitch the hardest 10 × 10 area such as a face or small text. Adjust the chart if threads look too similar.
Try it now
Everything in this guide works in the free cross stitch pattern maker, right in your browser, with no account.
Open the Studio editor →A pattern to practise with
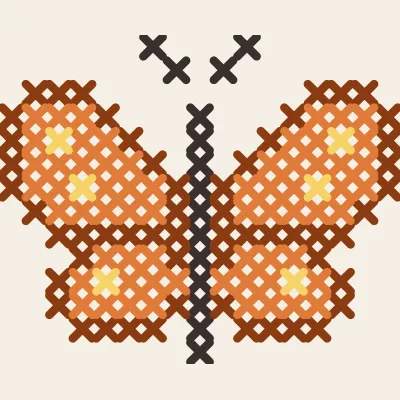
Orange Butterfly
A symmetrical butterfly with spotted wings, 17×14.