Guide
How to Design a Custom Cross Stitch Pattern From Scratch
The short answer
To design a custom cross stitch pattern, decide the finished size and fabric first, choose a starting point (a photo, text or a blank grid), limit yourself to a planned palette of about 5–15 colours, block in large shapes before details, then check the chart for isolated stitches and readability before printing it with a symbol key.
A custom pattern is one made for a specific person, place or moment: a family home, a pet, a favourite saying, a wedding date. You don’t need artistic training to make one. You need a clear plan and a tool that lets you work in stitches rather than pixels. This guide covers the planning decisions that matter, whatever your starting point.
Decide the size before anything else
Every later decision depends on size. Ask:
- Where will it go? A card, a hoop, a frame, a cushion?
- How big is that, in inches or cm?
- Which fabric? 14-count Aida is the easy default.
Multiply: a 6-inch-wide piece on 14-count is 84 stitches wide. That stitch width is your design canvas. The Aida count guide has the formula and a table.
Smaller canvases are not a compromise; they force simplicity, which usually looks better in thread.
Choose a starting point
There are three good ways in:
| Start from | Best for | Tool |
|---|---|---|
| A photo | Pets, places, flowers, objects | Photo converter |
| Words | Names, dates, quotes, initials | Text generator |
| A blank grid | Icons, motifs, borders, abstract designs | Studio blank grid or graph paper |
You can combine them: convert a photo of a house, then add the family name underneath by pasting in a text design.
Plan the palette
Before drawing, decide on a small palette. 5–8 colours suit motifs and icons; 10–15 suit photo-based designs. For each main area, think in three tones: a base, a shadow and a highlight. That’s enough to suggest form.
In the Studio, add colours from the Colours panel and give them meaningful names (“Roof shadow”, “Window glass”). The names print in the key, so your future self knows what each is for.
Compose for the grid
- Big shapes first. Block in the large areas with the rectangle and fill tools before adding details.
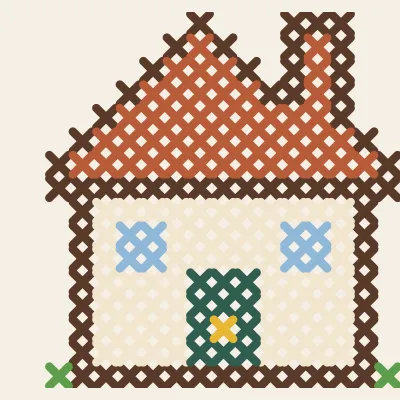
- Outlines help small designs. A one-stitch dark outline makes a motif read clearly from a distance, as in the Cottage House pattern.
- Diagonals step in ones. A 45° line is a staircase of single stitches; shallower angles use runs (2-1, 3-1). Keep each diagonal’s rhythm consistent.
- Symmetry is a gift. Draw half, then copy, flip horizontally and paste to mirror it exactly.
- Leave breathing room. A few empty stitches between elements and the border keep a design from feeling cramped.
Use the editor’s tools
The Studio has the tools a pattern designer needs:
- Pencil and eraser (erasing makes a square no-stitch)
- Fill for contiguous areas
- Line and rectangle (hold Shift for a filled rectangle)
- Eyedropper to pick an existing colour
- Select to copy, cut, move and flip any area, with a preview you confirm before it’s applied
- Undo/redo for up to 100 steps
Keyboard users can edit any square by row and column in the Cell editor, or move a cursor with the arrow keys. All tools are listed under the ? button.
Check it like a stitcher
Before printing, open the Check panel. It counts stitches, colours and regions, and highlights isolated single stitches. Some are intentional (an eye, a star); protect those and clean up the rest. Then view the chart in Symbols mode: if two colours have confusingly similar symbols, change one. The confetti guide explains each step.
Test before committing
For a big custom piece, stitch a small section first, especially faces or text. Twenty minutes of testing can save weeks of unpicking.
Rights and originality
A design you draw yourself is yours. A design based on your own photo is yours too. If your design is based on someone else’s photo, artwork, character or logo, it’s a derivative of their work: fine for personal use in many cases, but not for sharing or selling without permission. Our terms explain how this site treats your designs: we don’t claim any rights to them.
Common mistakes
- Starting to draw before choosing the size.
- Using 30 colours where 8 would do.
- Adding detail smaller than one stitch can show (eyelashes, fine text).
- Forgetting fabric margins when buying materials.
A custom pattern doesn’t need to be complicated to be meaningful. A small house, a name and a date, in five colours, can be the most-loved thing on the wall.
Worked example: a house portrait with a family name
Brief: a 6 × 6 inch hoop showing the family home, with the surname underneath.
- Size: a 6-inch hoop with breathing room suits a design around 5 inches wide: 70 stitches on 14-count. Set a 70 × 70 canvas.
- House: convert a front-on photo of the house at 70 wide and 8 colours to get proportions. Then simplify: redraw the roof and walls as clean blocks with the rectangle tool and keep windows as simple squares. The Cottage House pattern on this site shows how much character survives in very few colours.
- Name: set the surname in Hearth Block (7 stitches tall) and paste it centred under the house, leaving 3–4 rows of space.
- Palette: six to eight colours: roof, roof shadow, walls, windows, door, outline, and one accent for flowers or a door knob.
- Check: run the Stitchability Check; a drawn design like this should have very few isolated groups apart from intentional details such as door knobs.
- Print at a large square size for comfortable reading.
A palette that always works
| Role | Example |
|---|---|
| Darkest outline | Charcoal or walnut |
| Main object | Your subject’s main colour |
| Shadow of the main colour | One step darker |
| Highlight | One step lighter |
| Accent | A small amount of a contrasting colour |
| Background (optional) | Often left as fabric |
Designing for gifting
Ask the recipient’s taste discreetly (colours they like, where it will hang) and design to that size and palette; it’s the most reliable way to make a personal piece that gets displayed.
Plan the threads before you stitch
A design isn’t finished until you know what to buy. Open the Threads tab in the Studio:
- Check each colour’s nearest DMC thread. Close matches can be accepted as they are; loose matches are worth replacing by hand. Search by number (“3865”) or by name (“moss”) and press Use.
- Snap the palette if you want every colour to be a real thread. Colours that land on the same thread are merged, so the key never lists one skein twice. You can undo it.
- Set your strands to match the fabric (two on 14-count is the usual choice). The list estimates skeins per colour from the real stitch counts.
- Download the CSV or export the PDF; both carry the codes and estimates.
Doing this before you stitch catches two common problems early: two chart colours that are so close they become the same thread, and a background colour that needs more skeins than you expected. Buy those large colours together so the dye lot matches.
When to stop editing
Stop when the design reads clearly at arm’s length in the “Stitched” preview, the Stitchability Check reports few isolated stitches, and every colour has a thread you can buy. Extra polishing after that rarely shows in the finished piece.
Questions stitchers ask
Do I need drawing skills to design a pattern?
No. Start from a photo or text, keep the palette small and work in stitches rather than smooth lines. Simple, bold shapes stitch best anyway.
What size should a first custom design be?
Under about 60 × 60 stitches. It is big enough for a meaningful motif and small enough to finish quickly.
Can I sell patterns I design here?
Designs you make from your own photos, drawings or text are yours. If you start from someone else’s image, character or logo, their rights still apply.
How do I make a design symmetrical?
Draw one half, select it, copy, paste, flip it horizontally and position it next to the original before applying.
Try it now
Everything in this guide works in the free cross stitch pattern maker, right in your browser, with no account.
Start a blank grid in the Studio →A pattern to practise with
Cottage House
A small cottage with a chimney, windows and a door, 17×16.